Content Menu
● Understanding Your Golf Cart's Electrical System
● Required Tools and Materials
>> Tools:
>> Materials:
● Step-by-Step Installation Guide
>> Step 1: Prepare Your Golf Cart
>> Step 2: Install the Dash Kit
>> Step 3: Wire the Radio
>> Step 4: Install Speakers
>> Step 5: Finalize Installation
● Troubleshooting Common Issues
>> Radio Turns Off While Driving:
>> Poor Sound Quality:
>> Radio Not Powering On:
● Enhancing Your Golf Cart Experience
● Video Tutorial
● Conclusion
● FAQ
>> 1. What type of radio is best for an electric golf cart?
>> 2. Can I use my existing car stereo in my golf cart?
>> 3. How do I know if my golf cart's battery can support a new radio?
>> 4. Is professional installation recommended?
>> 5. Can I add more speakers later?
Adding a radio to your electric golf cart can significantly enhance your outdoor experience, whether you're cruising around the golf course, neighborhood, or campground. This comprehensive guide will walk you through the process of wiring a radio in your electric golf cart, covering everything from selecting the right equipment to installation tips and troubleshooting.

Understanding Your Golf Cart's Electrical System
Before diving into the installation process, it's essential to understand the electrical system of your golf cart. Most electric golf carts operate on a 36-volt or 48-volt battery system. To power a standard car radio, which typically requires 12 volts, you'll need to either tap into one of the batteries or use a voltage reducer[2].
- Batteries: Identify whether your cart has 6-volt or 12-volt batteries.
- Voltage Reducer: If using a 36 or 48-volt system, consider installing a voltage reducer to ensure safe operation of your radio.
- Wiring: Ensure you have the necessary wiring and connectors for installation.
Required Tools and Materials
Before starting the installation, gather the following tools and materials:
Tools:
- Screwdriver set
- Wire strippers
- Crimping tool
- Drill with various bits
- Multimeter
- Heat gun (for heat shrink tubing)
Materials:
- Radio head unit
- Speakers
- Wiring harness
- Mounting brackets
- Voltage reducer (if necessary)
- Fuse block
- Heat shrink tubing
- Zip ties
- Silicone sealant
Step-by-Step Installation Guide
Step 1: Prepare Your Golf Cart
1. Disconnect the Batteries: For safety, disconnect the negative terminal of your golf cart's battery before beginning any electrical work[2].
2. Remove Existing Dash Panel: If your golf cart has an existing dash panel, carefully remove it to access the area where you will install the radio.
3. Plan Your Layout: Before cutting or drilling, plan where each component will go. This includes the radio, speakers, and any additional accessories.
Step 2: Install the Dash Kit
1. Fit the Dash Kit: If using a dash kit, fit it into place according to the manufacturer's instructions. This may involve securing it with screws or clips[2].
2. Drill Holes if Necessary: Some installations may require drilling holes for screws or wiring pathways. Use a drill bit appropriate for the material of your dash.
3. Prepare Wiring Channels: Create pathways for your wires to run neatly behind the dash. This might involve removing panels or creating small channels.

Step 3: Wire the Radio
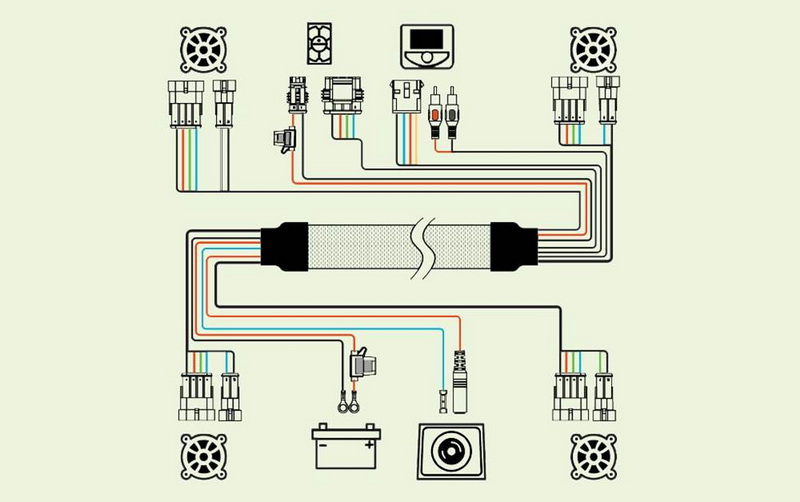
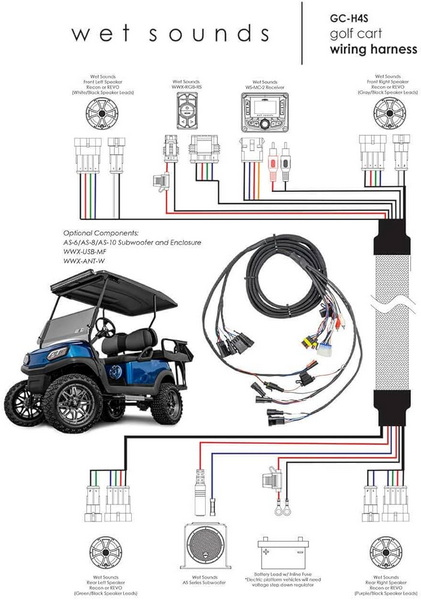
1. Connect Power Wires: Using your wiring harness, connect the power wire from the radio to the positive terminal of one battery (for a direct connection) or to the output of your voltage reducer[2][9].
2. Ground Connection: Connect the ground wire from the radio to either the negative terminal of the battery or to a grounding point on the cart's chassis.
3. Speaker Wires: Run speaker wires from the radio location to where you plan to install speakers. Connect these wires according to color coding (typically red for positive and black for negative).
4. Use Heat Shrink Tubing: For all connections, use heat shrink tubing to protect against moisture and short circuits.
5. Fuse Installation: Install an inline fuse on the power wire close to the battery. This protects your radio and cart from electrical issues[9].
Step 4: Install Speakers
1. Choose Speaker Locations: Common locations include under the dash or on rear-facing panels. Consider water-resistant or marine-grade speakers for better durability[2].
2. Mount Speakers: Securely mount speakers using screws or brackets provided with them. Ensure they're positioned for optimal sound projection.
3. Connect Speaker Wires: Attach speaker wires to each speaker, ensuring proper polarity is maintained. Use crimp connectors or solder the connections for reliability.
4. Weatherproof Connections: Apply silicone sealant around speaker edges and connections to prevent water ingress.
Step 5: Finalize Installation
1. Reattach Dash Panel: Once all connections are made and secure, reattach any dash panels that were removed[2].
2. Reconnect Batteries: Reconnect the negative terminal of your battery.
3. Test Your System: Turn on your golf cart and test the radio to ensure it works correctly. Adjust volume and settings as needed.
4. Secure Loose Wires: Use zip ties to secure any loose wires, ensuring they don't interfere with moving parts or pedals.
Troubleshooting Common Issues
If you encounter issues during or after installation, consider these troubleshooting tips:
Radio Turns Off While Driving:
- Check all connections for loose wires.
- Ensure the voltage reducer (if used) is functioning correctly.
- Verify that the battery powering the radio has sufficient charge.
Poor Sound Quality:
- Check speaker connections for proper polarity.
- Ensure speakers are properly mounted and sealed.
- Adjust equalizer settings on the radio.
Radio Not Powering On:
- Check fuse connections and replace if necessary.
- Verify power connections to the battery.
- Test voltage at the radio with a multimeter.
Enhancing Your Golf Cart Experience
Adding a radio to your golf cart opens up a world of possibilities for entertainment on the go. Consider these additional enhancements:
- Bluetooth Connectivity: Many modern radios offer Bluetooth functionality, allowing you to stream music from your smartphone[5].
- USB Charging Ports: Install USB ports for convenient device charging while on the move.
- LED Lighting: Add ambient lighting to complement your audio system and enhance the overall atmosphere.
Video Tutorial
For a visual guide on installing a radio in your golf cart, check out this helpful video:
Conclusion
Installing a radio in your electric golf cart can greatly enhance your riding experience. By following this comprehensive guide, you can successfully wire and install a radio system that provides entertainment and functionality to your golf cart. Remember to prioritize safety, use quality components, and take your time during the installation process. With a little patience and attention to detail, you'll be enjoying your favorite tunes on the golf course or during leisurely rides in no time.

FAQ
1. What type of radio is best for an electric golf cart?
Marine-grade or weatherproof radios are ideal for golf carts due to their resistance to moisture and durability in outdoor environments. Look for radios with Bluetooth connectivity and USB ports for added convenience.
2. Can I use my existing car stereo in my golf cart?
While it's possible to use a car stereo in a golf cart, it's not recommended. Car stereos are not designed for the vibrations and exposure to elements that golf carts experience. It's better to choose a radio specifically designed for outdoor use.
3. How do I know if my golf cart's battery can support a new radio?
Most golf cart batteries can support a radio, but it's important to check your cart's voltage (typically 36V or 48V) and use a voltage reducer if necessary. Consult your golf cart's manual or a professional to ensure compatibility.
4. Is professional installation recommended?
While DIY installation is possible for those with electrical experience, professional installation ensures proper wiring and reduces the risk of damage to your golf cart's electrical system. It's recommended for those unfamiliar with automotive electronics.
5. Can I add more speakers later?
Yes, you can add more speakers to your golf cart audio system later. Ensure your radio has enough channels to support additional speakers and plan the wiring accordingly during the initial installation to make future upgrades easier.


