Content Menu
● Understanding Golf Cart Battery Systems
● Types of Golf Cart Batteries
● Tools and Materials Needed
● Safety Precautions
● Step-by-Step Guide to Installing Golf Cart Batteries
>> Step 1: Prepare for Installation
>> Step 2: Remove Old Batteries
>> Step 3: Clean Battery Compartment
>> Step 4: Install New Batteries
>> Step 5: Connect Main Cables
>> Step 6: Final Checks
● Maintenance Tips for Golf Cart Batteries
● Common Issues with Golf Cart Batteries
● Troubleshooting Common Battery Problems
● Understanding Battery Lifespan and Replacement Signs
● Conclusion
● Frequently Asked Questions (FAQ)
>> 1. How often should I replace my golf cart batteries?
>> 2. What type of batteries should I use for my golf cart?
>> 3. Can I install golf cart batteries myself?
>> 4. What tools do I need for installing golf cart batteries?
>> 5. Why is it important to take pictures before removing old batteries?
Installing batteries in an electric golf cart is a crucial maintenance task that ensures your vehicle operates efficiently. This guide will provide a comprehensive overview of the entire process, from selecting the right batteries to the final installation steps. By following these instructions, you can confidently replace your golf cart batteries and keep your vehicle running smoothly.

Understanding Golf Cart Battery Systems
Before diving into the installation process, it's essential to understand the different types of battery systems used in electric golf carts. Most commonly, golf carts operate on either a 36-volt or 48-volt system.
- 36-Volt System: Typically uses six 6-volt batteries connected in series.
- 48-Volt System: Can use six 8-volt batteries, eight 6-volt batteries, or four 12-volt batteries.
Knowing your system will help you select the correct batteries and ensure proper installation.
Types of Golf Cart Batteries
When it comes to golf cart batteries, there are several types to consider:
- Lead-Acid Batteries: The most traditional and cost-effective option. These "wet" batteries contain a mixture of electrolytes and water, making them suitable for regular, recreational use. However, they require regular maintenance, including adding water above the lead plates.
- Absorbed Glass Mat (AGM) Batteries: An improved version of lead-acid batteries that utilize fiberglass mats between the lead plates, eliminating the need for watering and making them leak-free and sealed.
- Gel Batteries: These are similar to lead-acid but contain a gel-like electrolyte that prevents spills and requires less maintenance.
Choosing the right type of battery depends on your usage patterns and maintenance preferences.
Tools and Materials Needed
To successfully install new batteries in your electric golf cart, gather the following tools and materials:
- Wrenches or pliers
- Wire brush or battery cleaner
- Safety gloves and goggles
- New batteries (ensure they are appropriate for your system)
- Battery terminal protector
- A camera or smartphone (to take pictures of the existing battery setup)
Safety Precautions
Working with batteries can be hazardous due to the potential for acid leaks and electrical shock. Follow these safety precautions:
1. Wear protective eyewear and gloves.
2. Ensure the golf cart is turned off and disconnected from any charger.
3. Work in a well-ventilated area to avoid inhaling any fumes.

Step-by-Step Guide to Installing Golf Cart Batteries
Step 1: Prepare for Installation
1. Locate the Battery Compartment: Most golf carts have their batteries located under the seat. Remove the seat or access panel to reach the battery compartment.
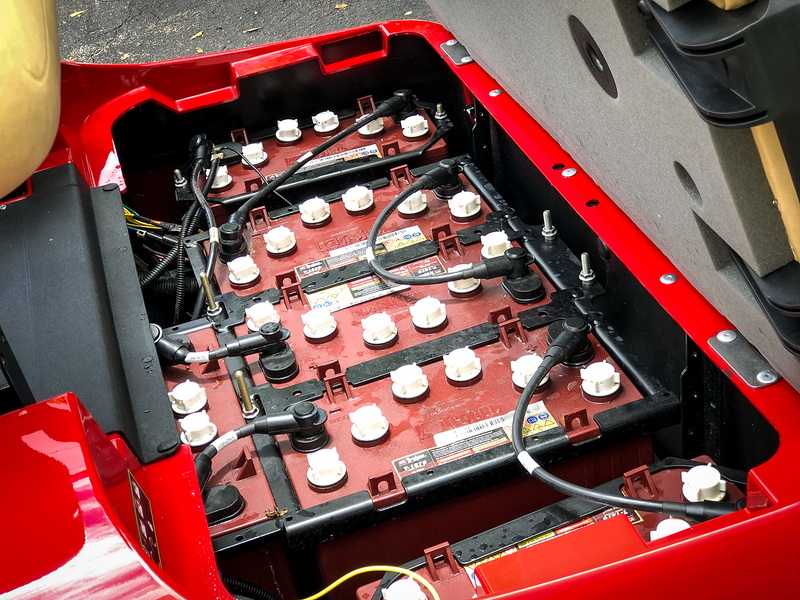
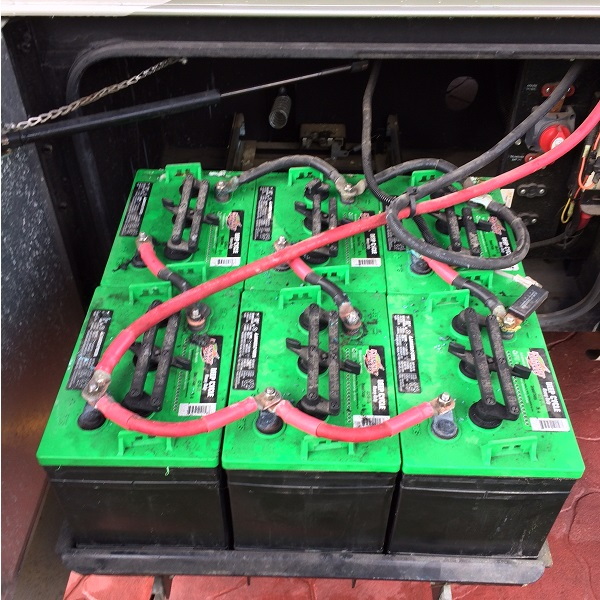
2. Document Existing Setup: Take a picture of how the old batteries are connected. This will serve as a reference when installing the new batteries.
Step 2: Remove Old Batteries
1. Disconnect Cables: Start by disconnecting the negative (black) cable from each battery first, followed by the positive (red) cable. This reduces the risk of short-circuiting.
2. Remove Brackets: If your batteries are secured with brackets, use a wrench to remove them carefully.
3. Take Out Batteries: Lift out each battery one at a time, ensuring you have a safe place to set them down.
Step 3: Clean Battery Compartment
1. Inspect for Corrosion: Check for any corrosion or debris in the battery compartment. Clean it using a wire brush and a baking soda solution if necessary.
2. Dry Thoroughly: Allow everything to dry completely before proceeding with installation.
Step 4: Install New Batteries
1. Position New Batteries: Place the new batteries into the compartment in the same orientation as documented earlier.
2. Connect Batteries in Series:
- For a 36-volt system, connect each battery's positive terminal to the next battery's negative terminal.
- For a 48-volt system with six 8-volt batteries, follow this pattern until all six batteries are linked together.
3. Secure Batteries with Brackets: If applicable, reattach any brackets that hold the batteries securely in place.
Step 5: Connect Main Cables
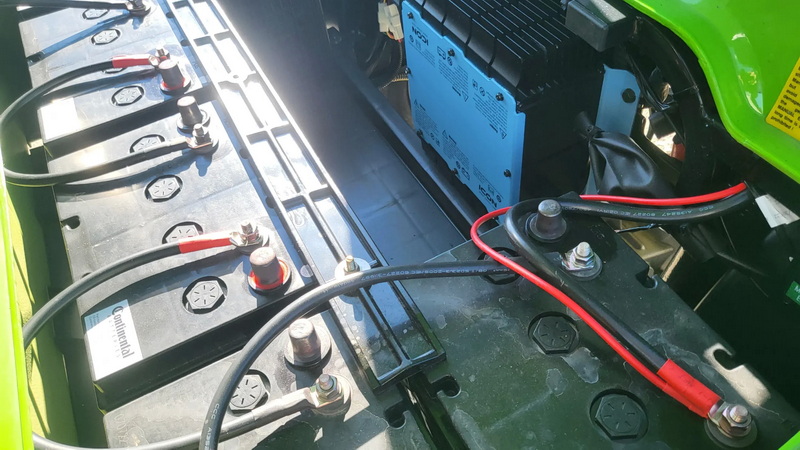
1. Attach Positive Cable: Connect the main positive cable to the positive terminal of the first battery in your series.
2. Attach Negative Cable: Connect the main negative cable to the negative terminal of the last battery in your series.
3. Tighten Connections: Ensure all connections are tight using your wrench or pliers.
Step 6: Final Checks
1. Inspect Connections: Double-check all connections for security and correctness.
2. Apply Terminal Protector: Use a battery terminal protector on each terminal to prevent future corrosion.
3. Charge Your Batteries: Plug in your charger and allow it to fully charge before using your golf cart.

Maintenance Tips for Golf Cart Batteries
To ensure longevity and optimal performance from your golf cart batteries, consider these maintenance tips:
- Keep Batteries Clean: Regularly clean terminals with a mixture of baking soda and water to prevent corrosion.
- Monitor Water Levels: For lead-acid batteries, check water levels monthly and add distilled water as needed.
- Avoid Overcharging: Use an automatic charger that prevents overcharging to protect battery life.
- Store Properly: If not in use for extended periods, store batteries in a cool, dry place after fully charging them.
- Regular Use: Use your golf cart regularly to keep batteries charged; otherwise, perform refresh charges every month or so.
Common Issues with Golf Cart Batteries
Even with proper care, you may encounter issues with your golf cart batteries:
1. Corrosion on Terminals: This can prevent proper charging; clean terminals regularly.
2. Low Voltage Readings: Use a multimeter to check voltage; if readings are low, it may indicate a failing battery.
3. Loose Connections: Ensure all connections are tight; loose cables can lead to poor performance.
4. Deep Discharge Symptoms: Avoid letting your batteries discharge below 50% capacity as this can shorten their lifespan significantly.
5. Old Age: Batteries typically last between 4 to 6 years; if yours are older than this, consider replacing them even if they seem functional.
Troubleshooting Common Battery Problems
If you experience issues with your golf cart after installing new batteries, here are some troubleshooting steps:
Check Battery Voltage:
- Use a multimeter to measure each battery's voltage individually.
- Ensure all readings are within acceptable ranges (e.g., at least 6 volts for 6V batteries).
Inspect Connections Again:
- Revisit all connections made during installation.
- Look for any signs of looseness or corrosion that may have been missed initially.
Test Charger Functionality:
- If your cart isn't charging correctly after installation, check if your charger is functioning properly.
- You may need another charger or consult an electrician if issues persist.
Monitor Performance During Use:
- Pay attention to how your golf cart performs during use.
- If it struggles on inclines or loses power quickly, this may indicate an issue with one or more of your new batteries.
Understanding Battery Lifespan and Replacement Signs
Knowing when it's time to replace your golf cart's batteries is crucial for maintaining performance:
Decreased Range or Power Output:
- If you notice that your golf cart doesn't travel as far on a single charge as it used to, this could be an early sign that your batteries are losing capacity.
Frequent Charging Required:
- If you find yourself needing to charge more often than usual after short trips, it's time for an evaluation of your battery health.
Physical Damage or Bulging Cases:
- Inspect each battery for physical damage such as cracks or bulging cases which can indicate internal damage requiring immediate replacement.
Age of Batteries:
- As mentioned earlier, most lead-acid batteries last about 4–6 years; if yours are approaching this age limit without regular maintenance checks performed throughout their lifespan, consider replacing them preemptively.
Conclusion
Installing new batteries in an electric golf cart may seem daunting at first, but with proper preparation and attention to detail, it can be done safely and efficiently. Regular maintenance of your golf cart's battery system will enhance its performance and longevity, ensuring many enjoyable rounds on the course ahead.

Frequently Asked Questions (FAQ)
1. How often should I replace my golf cart batteries?
Typically, golf cart batteries should be replaced every 4 to 6 years, depending on usage and maintenance practices.
2. What type of batteries should I use for my golf cart?
Always refer to your owner's manual for specifications; common types include lead-acid (6V or 8V) or lithium-ion batteries for newer models.
3. Can I install golf cart batteries myself?
Yes, as long as you follow safety precautions and installation steps carefully, you can install them yourself.
4. What tools do I need for installing golf cart batteries?
You will need wrenches or pliers, a wire brush or cleaner, safety gear (gloves and goggles), and possibly a camera for documentation purposes.
5. Why is it important to take pictures before removing old batteries?
Taking pictures helps ensure that you can correctly reconnect all wires and cables when installing new batteries, preventing confusion and mistakes during reinstallation.


