Content Menu
● Understanding the Brake System
● Common Symptoms of Brake Issues
● Tools and Materials Needed
● Step-by-Step Guide to Fixing Electric Golf Cart Brakes
>> Step 1: Safety First
>> Step 2: Lift the Golf Cart
>> Step 3: Inspecting Brake Components
>> Step 4: Removing Old Brake Shoes/Pads
>> Step 5: Cleaning Components
>> Step 6: Installing New Brake Shoes/Pads
>> Step 7: Adjusting Brake Tension
>> Step 8: Reassemble and Test
● Additional Maintenance Tips
● Troubleshooting Common Brake Problems
● Conclusion
● FAQ
>> 1. How often should I check my golf cart brakes?
>> 2. What tools do I need for brake maintenance?
>> 3. Can I replace my golf cart brakes myself?
>> 4. What are signs that my brake shoes need replacing?
>> 5. Is it necessary to clean my brake components?
Maintaining your electric golf cart is essential for ensuring a smooth and safe ride. One of the most critical components of your golf cart is its braking system. Over time, brakes can wear down, become less effective, or even fail if not properly maintained. This guide will walk you through the steps to fix the brakes on an electric golf cart, focusing on the most common issues and their solutions.

Understanding the Brake System
Before diving into repairs, it's important to understand how the brake system works on an electric golf cart. Most electric golf carts use mechanical drum brakes or hydraulic disc brakes. Here's a brief overview of each type:
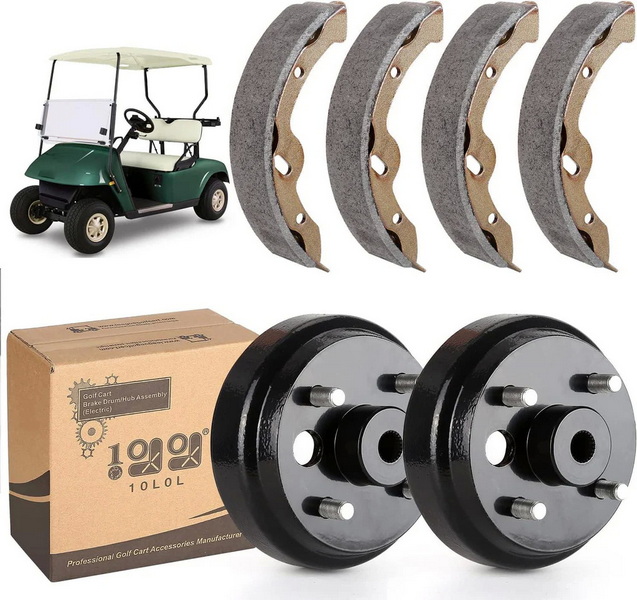
- Mechanical Drum Brakes: These brakes work by pressing brake shoes against a drum to create friction, which slows down the wheels. They are generally simpler in design and easier to maintain.
- Hydraulic Disc Brakes: These are more efficient and responsive, using brake pads that squeeze against a disc to stop the vehicle. They provide better stopping power and are less prone to overheating.
Knowing which type your cart uses will help you understand the repair process better.
Common Symptoms of Brake Issues
Before addressing how to fix the brakes, let's identify some common symptoms that indicate brake problems:
- Squeaking or Grinding Noises: This often means that the brake pads are worn out and need replacement.
- Soft or Spongy Brake Pedal: This could indicate air in the brake lines (for hydraulic systems) or worn components.
- Pulling to One Side: If your cart pulls to one side when braking, it may be due to uneven wear on the brake shoes or pads.
- Brake Warning Light: Many modern carts have a warning light that indicates when there's an issue with the braking system.
Tools and Materials Needed
Before starting your repair, gather the following tools and materials:
- Floor jack and jack stands
- Wrench set
- Screwdrivers (flathead and Phillips)
- Pliers
- Brake cleaner
- New brake shoes or pads (if needed)
- Lubricant (like WD-40 or grease)
- Safety goggles and gloves
Step-by-Step Guide to Fixing Electric Golf Cart Brakes
Step 1: Safety First
Always prioritize safety when working on your golf cart. Start by parking it on a flat surface and engaging the parking brake. Use wheel chocks to prevent any movement.
Step 2: Lift the Golf Cart
Using a floor jack, lift the rear of the golf cart off the ground. Secure it with jack stands for safety. Remove the rear wheels using a wrench.
Step 3: Inspecting Brake Components
Once you have access to the brake assembly:
1. Check Brake Shoes/Pads: Look for signs of wear. If they are worn down significantly, they will need replacement.
2. Inspect Brake Drums/Discs: If you have drum brakes, check for grooves or scoring on the drums. For disc brakes, ensure there's no warping or damage.
3. Examine Brake Lines: For hydraulic systems, inspect brake lines for leaks or cracks that could lead to loss of pressure.
4. Look at Master Cylinder: Check fluid levels in the master cylinder; low fluid levels can indicate leaks in the system.
5. Inspect Brake Cables: For mechanical systems, ensure that cables are not frayed or damaged as they can affect braking performance.

Step 4: Removing Old Brake Shoes/Pads
For drum brakes:
1. Remove any retaining clips using pliers.
2. Detach the springs holding the shoes in place.
3. Carefully slide out the old shoes.
For disc brakes:
1. Remove the caliper by unscrewing it from its mounting bracket.
2. Slide out the old pads from their slots.
Step 5: Cleaning Components
Clean all components using brake cleaner to remove dust and debris. This step is crucial for ensuring proper function.
1. Clean Brake Drums/Discs: Use a clean cloth with brake cleaner to wipe down surfaces.
2. Remove Rust: If there's rust on any components, use sandpaper or a wire brush to clean it off gently.
3. Lubricate Moving Parts: Apply lubricant to any moving parts such as springs and pivot points to ensure smooth operation.
4. Check for Debris: Make sure there is no dirt or debris in any of the components that could interfere with operation.
Step 6: Installing New Brake Shoes/Pads
For drum brakes:
1. Position new shoes in place, ensuring they align correctly with all mounting points.
2. Reattach springs and clips securely.
For disc brakes:
1. Insert new pads into their slots in reverse order of removal.
2. Reattach the caliper over the new pads.
3. Ensure that all bolts are tightened according to manufacturer specifications.
Step 7: Adjusting Brake Tension
For drum brakes, adjust the tension using the star wheel adjuster located at the bottom of the assembly until you feel slight resistance when turning the drum by hand.
For hydraulic systems, check for proper pressure in lines and ensure there are no leaks.
Step 8: Reassemble and Test
Reattach wheels securely and lower your golf cart back to ground level. Test your brakes by pressing down on the pedal several times to ensure they engage properly.

Additional Maintenance Tips
To prolong the life of your golf cart's braking system, consider these additional maintenance tips:
- Regular Inspections: Schedule regular inspections every few months, especially if you frequently use your cart on hilly terrain or rough surfaces.
- Brake Fluid Replacement: If you have hydraulic brakes, replace brake fluid as recommended by your manufacturer (usually every two years).
- Keep It Clean: Regularly clean your golf cart's undercarriage and braking components to prevent dirt buildup that can affect performance.
- Monitor Usage: Be mindful of how often you use your brakes; aggressive braking can lead to faster wear.
- Check Tire Pressure: Proper tire pressure can affect braking performance; ensure tires are inflated according to manufacturer specifications.
Troubleshooting Common Brake Problems
If you've completed your brake repair but still experience issues, consider troubleshooting common problems:
- Brake Fade: If your brakes feel less effective after prolonged use, this might be due to overheating from excessive use or worn-out components needing replacement.
- Uneven Wear: If one side wears out faster than another, it could indicate misalignment or issues with suspension components that need addressing.
- Vibrations When Braking: This may suggest warped drums/discs or unevenly installed pads/shoes; inspect these components thoroughly if vibrations occur during braking.
Conclusion
Fixing the brakes on an electric golf cart can seem daunting but is manageable with some basic tools and knowledge. Regular maintenance will extend the life of your braking system and keep you safe while driving your cart. By following this guide, you can confidently address common brake issues and ensure that your electric golf cart remains reliable for years to come.

FAQ
1. How often should I check my golf cart brakes?
It is recommended to inspect your golf cart brakes at least once a year or more frequently if you use your cart often or in hilly areas.
2. What tools do I need for brake maintenance?
Basic tools include wrenches, screwdrivers, pliers, a floor jack, and safety equipment like goggles and gloves.
3. Can I replace my golf cart brakes myself?
Yes, if you have basic mechanical skills and tools, you can replace your golf cart brakes yourself following proper guidelines.
4. What are signs that my brake shoes need replacing?
Common signs include squeaking noises, reduced stopping power, and visible wear on brake shoes during inspection.
5. Is it necessary to clean my brake components?
Yes, cleaning is essential as it removes dust and debris that can interfere with braking performance.


