Content Menu
● Understanding the 4-Post Solenoid
● Tools and Materials Needed
● Step-by-Step Wiring Process
>> Step 1: Ensure Safety
>> Step 2: Locate the Solenoid
>> Step 3: Remove the Old Solenoid
>> Step 4: Install the New Solenoid
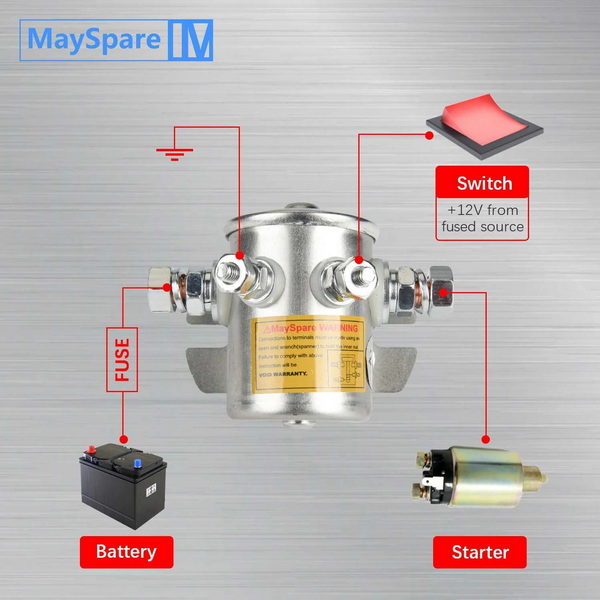
>> Step 5: Wire the Large Posts
>> Step 6: Wire the Small Posts
>> Step 7: Double-Check Connections
>> Step 8: Reconnect the Battery
● Visual Guide
● Troubleshooting Common Issues
● Maintenance Tips
● Conclusion
● Frequently Asked Questions
>> 1. How do I know if my golf cart solenoid is bad?
>> 2. Can I use a 3-post solenoid instead of a 4-post solenoid?
>> 3. How often should I replace my golf cart solenoid?
>> 4. Can I test a solenoid without removing it from the golf cart?
>> 5. What's the difference between the "S" and "I" terminals on a 4-post solenoid?
Wiring a 4-post solenoid in an electric golf cart is a crucial skill for maintaining and troubleshooting your vehicle. This comprehensive guide will walk you through the process step-by-step, providing valuable insights and tips to ensure a successful installation. Whether you're a DIY enthusiast or a professional mechanic, this article will equip you with the knowledge needed to properly wire a 4-post solenoid in your electric golf cart.

Understanding the 4-Post Solenoid
Before diving into the wiring process, it's essential to understand what a 4-post solenoid is and its function in an electric golf cart. A solenoid is an electromagnetic switch that controls the flow of high-current electricity from the battery to the starter motor or the main motor in electric vehicles. In golf carts, the solenoid plays a critical role in engaging the motor when you press the accelerator pedal.
A 4-post solenoid, as the name suggests, has four terminals or posts:
1. Two large posts for high-current connections
2. Two small posts for low-current control connections
Tools and Materials Needed
Before starting the wiring process, gather the following tools and materials:
- Socket set and ratchet
- Wire strippers
- Electrical tape
- Multimeter
- Replacement 4-post solenoid
- Wire connectors
- Safety gloves and goggles
Step-by-Step Wiring Process
Step 1: Ensure Safety
Before beginning any work on your golf cart's electrical system, it's crucial to prioritize safety:
1. Disconnect the main battery pack by removing the negative cable.
2. Wear safety gloves and goggles to protect yourself from electrical hazards.
Step 2: Locate the Solenoid
The solenoid is typically located near the battery compartment. In most golf carts, you'll find it under the seat or in a nearby compartment. Consult your golf cart's manual if you're having trouble locating it.

Step 3: Remove the Old Solenoid
Once you've located the solenoid:
1. Take a picture or make a diagram of the current wiring configuration for reference.
2. Carefully disconnect all wires from the old solenoid, noting which wire goes to which terminal.
3. Remove any mounting bolts and take out the old solenoid.
Step 4: Install the New Solenoid
1. Mount the new 4-post solenoid in the same location as the old one.
2. Secure it with the mounting bolts, ensuring it's firmly in place.
Step 5: Wire the Large Posts
The two large posts on the solenoid are for the high-current connections:
1. Connect the positive cable from the battery to one of the large posts[1].
2. Connect the cable leading to the motor or starter to the other large post[1].
Ensure these connections are tight and secure, as they will be carrying a significant amount of current.
Step 6: Wire the Small Posts
The two small posts are for the low-current control connections:
1. Connect the wire from the key switch or microswitch to one of the small posts (usually labeled "S" for switch)[2].
2. Connect the other small post (often labeled "I" for ignition) to the appropriate control wire, if your golf cart requires it. Some models may not use this connection[2].
Step 7: Double-Check Connections
Before finalizing the installation:
1. Review your wiring against the picture or diagram you made earlier.
2. Ensure all connections are tight and secure.
3. Check for any exposed wires and insulate them with electrical tape if necessary.
Step 8: Reconnect the Battery
Once you're confident in your wiring:
1. Reconnect the negative cable to the battery pack.
2. Turn the key to the "ON" position and test the golf cart's operation.
Visual Guide
To better understand the wiring process, watch this helpful video tutorial:
This video demonstrates the solenoid replacement process, which includes the wiring steps we've discussed.
Troubleshooting Common Issues
If you encounter problems after wiring your 4-post solenoid, consider these common issues and solutions:
1. Golf cart doesn't start: Check all connections for tightness and ensure the battery is fully charged.
2. Clicking sound but no movement: This could indicate a faulty solenoid or a weak battery. Test the solenoid with a multimeter.
3. Intermittent operation: Look for loose connections or corroded terminals.
4. Burning smell: Immediately disconnect the battery and check for any signs of overheating or melted wires.
Maintenance Tips
To keep your golf cart's electrical system in top condition:
1. Regularly inspect the solenoid and surrounding wires for signs of wear or damage.
2. Keep the battery terminals clean and free of corrosion.
3. Ensure all connections remain tight and secure.
4. Replace the solenoid if you notice any signs of failure or inconsistent performance.
Conclusion
Wiring a 4-post solenoid in an electric golf cart may seem daunting at first, but with the right knowledge and careful attention to detail, it's a task that many golf cart owners can accomplish. By following this guide, you can successfully wire your new solenoid and keep your golf cart running smoothly. Remember to prioritize safety throughout the process and don't hesitate to seek professional help if you're unsure about any step.

Frequently Asked Questions
1. How do I know if my golf cart solenoid is bad?
Common signs of a failing solenoid include:
- Clicking sound when you turn the key, but the cart doesn't move
- Intermittent starting issues
- Complete failure to start
- Burning smell near the solenoid
If you experience any of these symptoms, it's time to test and potentially replace your solenoid.
2. Can I use a 3-post solenoid instead of a 4-post solenoid?
While it's possible to use a 3-post solenoid in some cases, it's generally not recommended. 4-post solenoids offer better control and are designed specifically for many modern golf cart models. Always use the type of solenoid specified by your golf cart's manufacturer for optimal performance and safety.
3. How often should I replace my golf cart solenoid?
There's no set timeframe for replacing a golf cart solenoid. However, most solenoids last between 3-5 years with regular use. Factors like usage frequency, environmental conditions, and maintenance can affect lifespan. Replace your solenoid if you notice any signs of failure or inconsistent performance.
4. Can I test a solenoid without removing it from the golf cart?
Yes, you can test a solenoid while it's still installed in the golf cart using a multimeter. Set the multimeter to the ohms setting and test for continuity between the large terminals when the key is turned on. A reading of 0-0.5 ohms indicates a functioning solenoid. No continuity or very high resistance suggests a faulty solenoid.
5. What's the difference between the "S" and "I" terminals on a 4-post solenoid?
The "S" terminal typically connects to the key switch or microswitch and receives the signal to engage the solenoid. The "I" terminal is for the ignition circuit in some golf cart models. Not all carts use the "I" terminal, so it's essential to refer to your specific model's wiring diagram when connecting these small posts.


